pythonanywhere를 이용해 배포하기
설치전 요구사항
- 로컬에 git 또는 sourceTree 설치하기
- github 계정 생성
- 로컬 프로젝트 github 에 업로드
배포전 특이사항
- settings 파일 dev, prod로 분리해서 사용
- secret.json 사용
- 개발환경 postgresql 배포환경 sqlite3 (postgresql은 유료버전에서만 사용가능)
1. https://www.pythonanywhere.com 회원가입 하기
Host, run, and code Python in the cloud: PythonAnywhere
Batteries included With Python versions 2.7, 3.5, 3.6, 3.7 and 3.8, and all the goodies you normally find in a Python installation, PythonAnywhere is also preconfigured with loads of useful libraries, like NumPy, SciPy, Mechanize, BeautifulSoup, pycrypto,
www.pythonanywhere.com
2. 로그인후 Web페이지에서 좌측 Add a new web app 클릭
- 수동으로 공부할 수 있도록 Manual configuration을 선택( 자동도 가능 )
- 파이썬 버전 3.8 선택

3. Consoles에서 bash 클릭
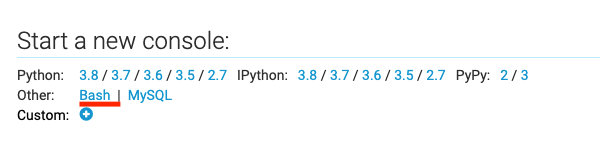
4. bash 실행

$ git clone https://github.com/<user_name>/<git_name>.git
$ tree <git_name>
5. vertualenv 설정
$ virtualenv --python=python3.8 <가상환경 이름>
$ source <가상환경 이름>/bin/activate
$ pip install -r requirement.txt
6. requirement.txt install
- 프로젝트에 라이브러리가 있을경우
7. 서버 설정
$ cd <프로젝트 이름>
$ python manage.py collectstatic --settings=config.settings.prod
$ python manage.py migrate --settings=config.settings.prod
$ python manage.py createsuperuser --settings=config.settings.prod
- 개발환경과 서비스환경 설정을 분리를 했을 경우
--settings=config.settings.prod 적기
8. web 메뉴 - virtualenv 설정
/home/<your-username>/your-env-name/
9. web 메뉴 WSGI 설정
# +++++++++++ DJANGO +++++++++++
# To use your own django app use code like this:
import os
import sys

# assuming your django settings file is at '/home/projectlab/mysite/mysite/settings.py'
# and your manage.py is is at '/home/projectlab/mysite/manage.py'
path = '/home/projectlab/projectlab'
if path not in sys.path:
    sys.path.append(path)

os.environ['DJANGO_SETTINGS_MODULE'] = 'config.settings.prod'

# then:
from django.core.wsgi import get_wsgi_application
application = get_wsgi_application()
10. secret json upload

11. static file 경로 설정

12. reload
